
Your Ultimate Hiking Training Plan for Any Trail
- Epic Brilliance
- Jun 27, 2025
- 17 min read

To get yourself truly ready for the trail, you need a plan. A solid hiking training plan is more than just walking a lot; it's a structured approach that builds the right kind of fitness over a dedicated period, usually somewhere between 4 to 12 weeks. It’s all about boosting your cardiovascular endurance, building functional strength, and getting your body conditioned for the unique demands of hiking. This way, you minimize your risk of injury and actually get to enjoy yourself out there.
Starting Your Hiking Journey on the Right Foot
Jumping into a new fitness routine can feel like a huge commitment, especially when your goal is a tough summit or a multi-day trek. But the secret isn't some superhuman effort. It’s about starting with an honest look at where you are right now and having a clear vision of where you want to go. A well-designed training plan is the bridge between those two points, creating a smart path to success that won’t leave you burned out.
The best plans aren't generic templates you download online. They're personal. That means getting real about your current fitness level and picking a specific, exciting adventure that will keep you motivated when the couch is calling.
Honestly Assess Your Current Fitness
Before you can start building, you have to know what you're building on. This isn't about being hard on yourself; it’s just about gathering the facts to create a plan that’s both safe and effective.
Think about two key areas:
Your Cardio Baseline: Where does your cardio stand today? Can you walk at a brisk pace for 30 minutes without getting totally winded? Maybe you already run or cycle a few times a week. Knowing this helps you figure out the right starting point for your endurance work.
Your Functional Strength: Hiking is far more than just cardio. You need strong legs to power you up steep inclines, a stable core to keep you balanced on rocky trails, and tough muscles to absorb the impact of long downhills. Can you do a set of bodyweight squats or lunges with good form? This gives you a quick clue about your base strength.
This infographic breaks down the basic flow for mapping out your plan's duration, how often you'll train, and how you'll ramp up the intensity.
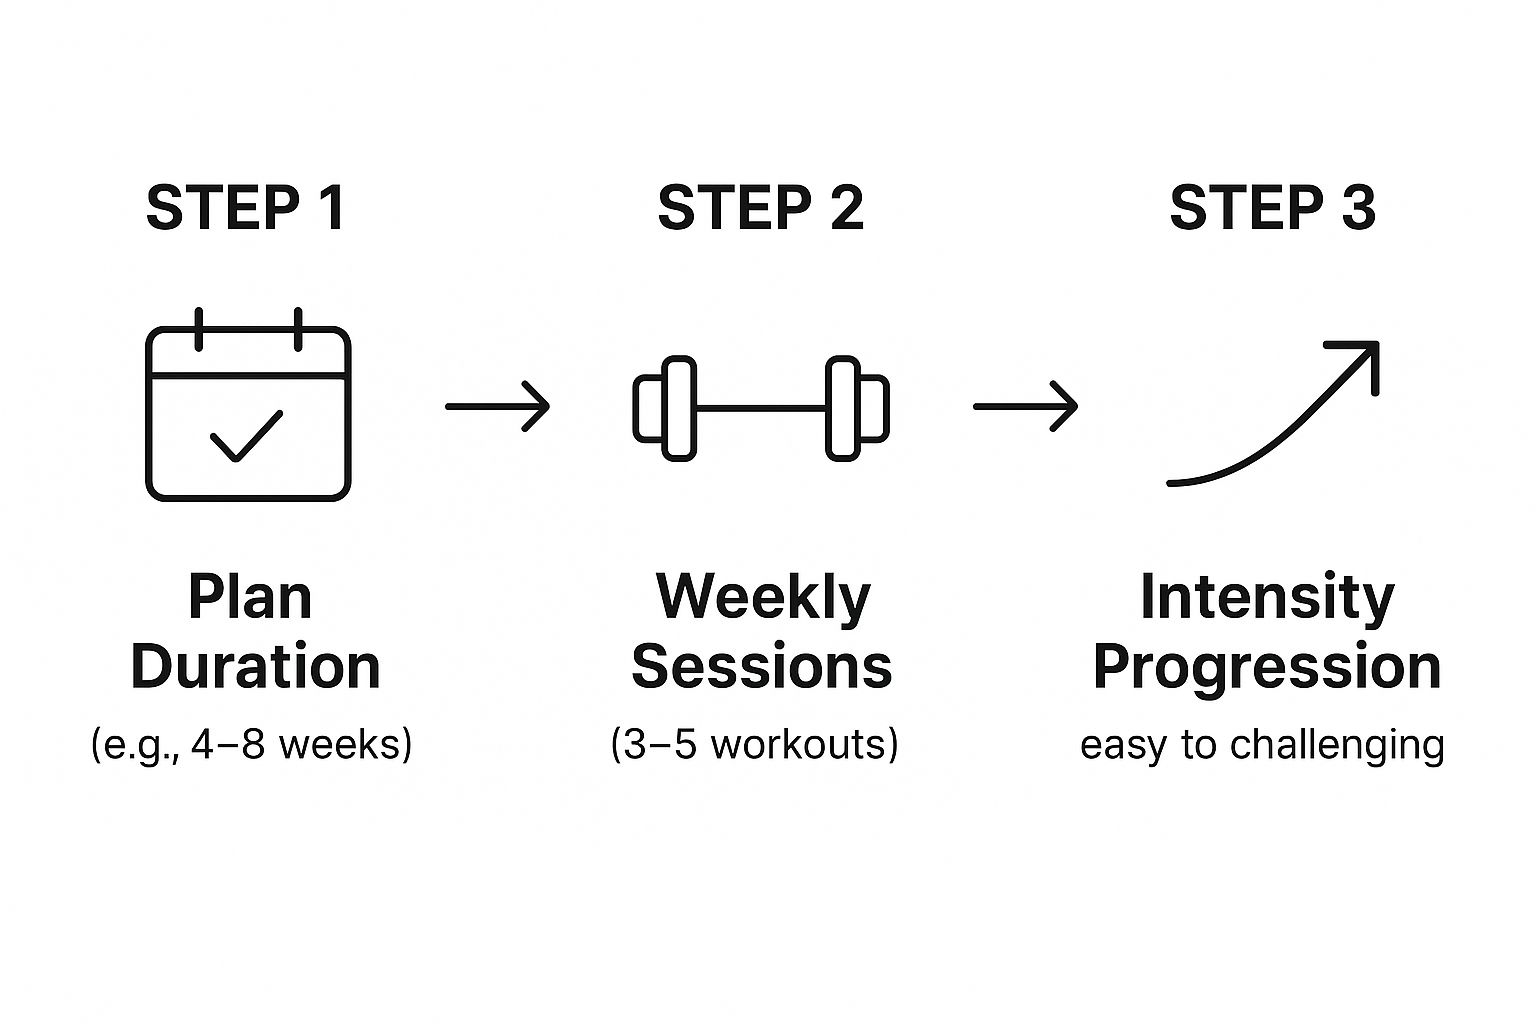
As you can see, a good plan starts with a set timeframe, is broken down into weekly workouts, and gets progressively tougher over the weeks.
Set a Motivating and Specific Goal
A vague goal like "get in shape for hiking" is a recipe for failure. It’s just too hard to train for something so fuzzy. A specific goal, on the other hand, gives you something real to work toward. So, pick an actual trail you want to conquer.
Is it that 5-mile local peak with 1,500 feet of elevation gain? Or maybe a challenging 10-mile section of a famous long-distance trail? Knowing the distance, elevation changes, and terrain of your goal hike is the single most important piece of the puzzle. It shapes everything else you do.
Your goal hike dictates the training. A plan for a flat 4-mile walk looks very different from a plan to summit a mountain. Let the trail be your guide.
Here’s a look at how you might structure a gradual build-up over 12 weeks. Notice how the long hike gets progressively longer while strength training remains consistent to support the increased mileage.
Sample 12-Week Hiking Training Progression
This table outlines a sample 12-week progression, showing how weekly hike duration and strength training frequency increase over time to build endurance safely.
Week | Long Hike Duration (Hours) | Mid-Week Hikes/Walks (Minutes) | Strength Sessions Per Week |
|---|---|---|---|
1-2 | 1-1.5 | 30-45 | 2 |
3-4 | 2-2.5 | 45 | 2 |
5-6 | 3-3.5 | 45-60 | 2-3 |
7-8 | 4-5 | 60 | 2-3 |
9-10 | 5-6 | 60 | 2 |
11 | 6-7 | 45 (light) | 1-2 |
12 | Goal Hike! | Rest/Light Walk | 0 |
This is just a template, of course. You'd adjust the starting point and progression rate based on your personal fitness and the specific demands of your goal hike.
Many programs out there miss the mark by being either way too simple or ridiculously complex. The basic ones often lack the detail needed to really prepare you and prevent injury. On the flip side, some programs are so scientific they're just overwhelming. The sweet spot is a balance of practical, actionable steps and proven training principles. If you want to dive deeper into this balanced philosophy, check out this detailed guide from Summit Strength.
Think of your personalized training plan as your roadmap, not a chore. It’s about building momentum one workout at a time, transforming you from an aspiring hiker into a confident one who’s ready for a lifetime of adventure.
Building Your Foundation for the Trail
Every great hike starts long before you reach the trailhead. It begins with building a solid foundation of fitness. Think of your body as having two critical systems for the trail: an engine and a chassis. Your engine is your cardiovascular system, and your chassis is your muscular strength. A successful training plan builds both.
It's tempting to think hiking is just a long walk, but preparing your body for hours on end, especially with a pack and over steep terrain, demands a more focused approach. This phase is all about building the resilience to handle that demand, turning a potential suffer-fest into a truly enjoyable adventure.
Mastering Your Cardio Engine
Your cardiovascular system is what keeps you moving. Improving its efficiency is probably the single most important thing you can do to enjoy longer, more ambitious hikes. The goal here is simple: train your heart and lungs to get oxygen to your muscles more effectively. This will push back fatigue and seriously boost your stamina.
The best way to do this is by mixing up your cardio. You’ll want to combine two different styles of training throughout the week:
Moderate-Intensity Sessions: This is your bread and butter. Think of a brisk walk where you can still chat, a light jog, or a steady pace on a stationary bike. These longer, slower workouts are absolutely essential for building your aerobic base.
High-Intensity Interval Training (HIIT): These are short, intense bursts of all-out effort followed by brief recovery periods. HIIT is a powerhouse for boosting your VO2 max—the maximum amount of oxygen your body can utilize during hard exercise. It’s a huge bang for your buck.
A good starting point is to aim for two or three moderate sessions of 45-60 minutes each week, along with one HIIT session. For instance, you could do a brisk walk on Tuesday and Thursday, then tackle some stair-climbing intervals on Saturday to really get your heart pumping.
Building Functional Strength for Tough Terrain
Strength training for hiking isn’t about aesthetics; it’s about creating a durable, injury-proof body. Every step on an uneven trail, especially going up and down hills, puts a ton of stress on your muscles and joints. Functional strength training targets the exact muscle groups that support and propel you on your journey.
Your focus should be on compound movements that mimic what you actually do while hiking. That means your legs, core, and back get top priority.
A strong core is your secret weapon on the trail. It acts like a natural weight belt, stabilizing your spine and improving your balance—which is a lifesaver when you're navigating a tricky rock scramble with a pack on.
Let’s zero in on the key exercises that give hikers the most benefit.
Key Exercises for Hiker Strength
Try to work these movements into your routine two or three times a week. Always prioritize good form over lifting heavy—that’s how you build real, usable strength and avoid injury.
Squats: This is the king of leg exercises for a reason. Squats build powerhouse quads, glutes, and hamstrings, which are your primary climbing muscles. Start with just your bodyweight, and once you’re comfortable, you can hold a dumbbell or kettlebell to progress.
Lunges: Lunges are fantastic because they build single-leg strength and stability. This translates directly to stepping up onto big rocks or over fallen logs on the trail. They also force your core to work harder to keep you balanced.
Step-Ups: This might be the most hike-specific exercise you can do indoors. Find a sturdy box, a park bench, or even a staircase. Step up with one foot, driving through your heel, and then slowly control your movement back down. To make it harder, hold weights or wear your loaded hiking pack.
Planks: Don't underestimate the simple plank. It strengthens your entire core—abs, obliques, and lower back. A strong core is what protects your spine from the repetitive jarring of hiking, especially when you're carrying weight.
Here’s how you can pull these together into a straightforward and effective workout:
Exercise | Sets | Repetitions | Rest |
|---|---|---|---|
Bodyweight Squats | 3 | 12-15 | 60 sec |
Alternating Lunges | 3 | 10 per leg | 60 sec |
Step-Ups | 3 | 12 per leg | 60 sec |
Plank | 3 | Hold for 30-60 sec | 45 sec |
By combining this kind of targeted strength work with smart cardio, you're building a body that’s truly ready for anything the trail throws your way.
Getting Serious: Advanced Conditioning for Big Treks

Once you've got a solid fitness base, you probably start eyeing bigger objectives. This is where the real fun begins—gearing up for high-altitude adventures, multi-day backpacking trips, or peaks with some serious vertical. Advanced conditioning is less about general fitness and more about forging a resilient, trail-hardened body that's ready for anything.
Think of this phase as a dress rehearsal for the main event. You’re teaching your body to handle a heavy load, slog up steep grades, and just keep moving for hours on end. The whole point is to make the actual hike feel like a challenge you’ve already conquered in training.
Get Comfortable With a Weighted Pack
If your trip involves carrying gear, training with a weighted pack is non-negotiable. It’s one of the most direct ways to prepare for a multi-day hike. This simple step transforms a regular training walk into a highly specific workout, strengthening your back, core, and legs in ways that unweighted hiking just can't. Plus, it gets your shoulders and hips used to the unique pressure of a load.
But you can’t just throw 30 pounds in a bag and hit the trail. That's a recipe for injury. You have to ease into it.
Start Light: Begin with a manageable 10-15% of your body weight. If you weigh 150 pounds, that’s about 15-22 pounds. Water bladders, dumbbells, or even bags of rice work great for adding weight.
Progress Slowly: Every week or two, add another 2-5 pounds. Your body needs time to adapt, so listen to it. If your joints are screaming or you feel unusual strain, back off the weight for a bit.
Watch Your Form: Fight the urge to hunch over. A heavy pack will pull you forward, but you need to keep an upright posture by engaging your core and driving with your legs.
By the time you step onto the actual trailhead, your fully loaded pack will feel like a familiar friend, not a shocking new burden.
Make Friends With Hills and Stairs
The golden rule of specificity is simple: to get good at hiking uphill, you have to hike uphill. If your goal trek involves gaining thousands of feet, training on flat ground just won't cut it. Your body will be in for a rude awakening. You need to actively hunt for terrain that mimics your objective.
This takes a bit of creativity, especially if you live somewhere flat. Look for every single opportunity to get on an incline.
Find Your "Mountain": Even a small hill becomes an incredible training tool when you do repeats. A local park hill, a long flight of stadium stairs, or even the stairwell in a tall office building can be your best friend. Use them to build climbing power.
The goal is to simulate the relentless, sustained effort of a long climb. A great session could be walking up and down stadium stairs for 30-45 minutes or doing laps on the steepest hill you can find. This targeted work is the cornerstone of any serious hiking plan because it builds the exact muscular endurance you’ll need in the mountains.
Building Real-Deal, All-Day Endurance
Truly demanding hikes aren't over in an hour. We're talking 6-8 hours (or more) of continuous movement. This requires a completely different type of endurance than you can build in a typical gym session. You need to train your body's energy systems to perform efficiently for the long haul.
This means dedicating one day a week to a long-duration workout. This is your "long hike" day, where the focus is time on your feet, not speed. These long, slow sessions are critical. They train your body to tap into its fat stores for fuel, which spares your limited glycogen reserves and gets you mentally prepared for being in motion all day.
A well-designed plan typically spans about 12 weeks, building you up progressively. For example, a beginner might aim for hikes up to 6 miles on gentle trails. An intermediate hiker might work up to 10-mile days with significant climbs, while an advanced plan prepares you for something like a 14-mile day with 4,000 feet of elevation gain in rugged, high-altitude terrain. This structured approach, like the graduated training levels at Fit For Trips, ensures your body adapts safely and effectively.
By layering in weighted pack work, elevation training, and long endurance days, you’re no longer just someone who hikes. You’re a hiker who is truly prepared for the mountains.
Fueling Your Hike with Smart Nutrition
Think of it this way: your physical training builds a powerful engine, but nutrition is the high-octane fuel that makes it perform. Without the right fuel, even the strongest engine will sputter and fail. A tough hike can torch 500-700 calories every hour, and showing up unprepared is the fastest way to "bonk" and hit that dreaded wall.
What you eat and drink before, during, and after you hit the trail is every bit as important as the miles you log and the squats you do. This isn't just about stuffing a granola bar in your pocket. It’s about strategically fueling your body for sustained energy, avoiding those sugar-fueled peaks and valleys, and helping your muscles recover so you're ready for the next adventure.
Your Pre-Hike Fueling Game Plan
What you eat the day before and the morning of your hike is like loading up a battery. You're giving your muscles the glycogen stores they'll need to draw from for hours on end.
Your main focus here should be on complex carbohydrates. These are the slow-burn logs for your internal fire, unlike simple sugars that are like throwing kindling on—a quick flash and then they're gone. Think whole-wheat pasta, brown rice, quinoa, and sweet potatoes. Pair these with some lean protein and healthy fats for a well-rounded, energy-packing meal.
A perfect pre-hike dinner could be something like grilled salmon with a big serving of roasted sweet potatoes and a side of broccoli. Then, on the morning of your hike, aim to eat something easy to digest about 1-2 hours before you start. A bowl of oatmeal topped with berries and walnuts or a whole-wheat bagel with a smear of peanut butter are classic, effective choices.
Snacking on the Trail for Peak Performance
Once your boots are on the ground, your strategy shifts from loading up to topping off. The trick is to eat small amounts often. I tell everyone to snack every 60-90 minutes, whether you feel hungry or not. By the time your stomach starts rumbling, you're already running on a deficit.
Your trail snacks have to be three things: calorie-dense, easy to eat while moving, and durable enough to survive being jostled around in your pack.
For a Quick Boost: When you're facing a steep, grueling climb, a handful of dried fruit like apricots or dates can give you that quick shot of fast-acting carbs.
For the Long Haul: A mix of nuts, seeds, or beef jerky provides a combination of protein and healthy fats. These digest more slowly, giving you that steady, sustained energy for the miles ahead.
For an Energy Emergency: Sometimes you just need a rapid fix. Energy gels or chews are designed for quick absorption and can be a real lifesaver when you feel yourself starting to fade.
Think of your body as a high-performance machine out on the trail. Just like a race car, it needs constant refueling to avoid a breakdown. Consistent snacking is your best insurance policy against hitting the wall miles from the trailhead.
Don't Forget Hydration and Electrolytes
Dehydration is the silent performance killer out on the trail. Even a minor drop in hydration—we're talking as little as 2% of your body weight—can lead to fatigue, headaches, and clumsy footwork.
A good starting point is to drink about half a liter of water for every hour of moderate hiking. You'll obviously need to ramp that up significantly in hot weather or on more strenuous terrain. Get a head start by drinking a glass or two of water before you even leave the house.
But when you sweat, you lose more than just water. You're also losing critical minerals called electrolytes, like sodium and potassium, which are essential for preventing muscle cramps and keeping everything firing correctly. On long, hot hikes, plain water often isn't enough. I always throw some electrolyte tablets or powders in my pack to add to my water. It's a small, simple step that makes a world of difference in how you feel on that final push back to the car.
Essential Gear And Injury Prevention Tactics
A solid training plan is only one piece of the puzzle. To really succeed on the trail, you need to focus on two other critical areas: your gear and smart injury prevention. Think of your gear as a direct extension of your body and avoiding injury as the key to a long, happy hiking life. If you neglect either one, even the best conditioning can get derailed fast.
This isn't about buying the most expensive stuff you can find. It’s about making strategic choices, and there's no better place to start than with your feet. Your hiking boots are, without a doubt, the single most important piece of gear you'll own. They are your connection to the trail and your first line of defense against whatever the terrain throws at you.
Choosing And Breaking In Your Hiking Boots
The wrong boots can turn a dream hike into a nightmare of blisters, bruised toes, and misery. When you're shopping for a pair, zero in on three things: fit, materials, and support.
Fit is everything. Seriously. Go boot shopping in the afternoon when your feet are a bit swollen, just like they'll be on a hike. Make sure you wear the same kind of socks you plan to hike in. You need enough room to wiggle your toes freely, but your heel should feel locked in place to stop it from sliding around and causing blisters.
Materials make a difference. Boots come in a range of materials, from light synthetic fabrics to classic full-grain leather. Synthetics are lighter and break in quicker, but leather offers unbeatable durability and water resistance. Your choice really depends on the kind of trails you're planning to tackle.
Support for the long haul. The "shank"—a stiff insert tucked between the midsole and outsole—is what gives a boot its rigidity. A stiffer boot offers more support on rocky, uneven ground. You'll also want to think about your ankle stability and how tough your goal hike is when choosing between a low, mid, or high-cut boot.
Once you’ve found the perfect pair, you are not done. Never take brand-new boots on a long hike. The "break-in" period is absolutely essential. Start by just wearing them around your house, then take them for short walks in your neighborhood. Gradually build up the time and start wearing your weighted pack to mimic real trail conditions. This process molds the boots perfectly to your feet and helps you spot any potential hot spots before they become a real problem on the trail.
Proactive Injury Prevention Strategies
All the training in the world won't help you if you're stuck on the couch with an injury. Any good hiking training plan must include proactive steps to keep your body healthy and resilient. At its core, this means stretching properly and learning to listen to what your body is telling you.
A word of experience: Overuse injuries like plantar fasciitis and IT band syndrome are incredibly common among hikers. They rarely pop up overnight. Instead, they’re the slow-burn result of ignoring small warning signs. Consistent stretching and smart recovery are your absolute best defense.
Start by making a stretching routine a non-negotiable part of your training. Target the muscles that do the most work on the trail.
Essential Stretches For Every Hiker
The best time to stretch is after your workouts or training hikes when your muscles are warm and pliable. Hold each stretch for 20-30 seconds—and please, don't bounce.
Hip Flexor Stretch: Kneel on one knee, with your other foot flat on the floor out in front of you. Gently push your hips forward until you feel a good stretch in the front of your hip. This one is crucial for counteracting all that climbing.
Standing Hamstring Stretch: Pop your heel up on a low step or a sturdy rock. Keeping that leg straight, hinge forward from your hips until you feel a stretch all the way down the back of your thigh.
Calf Stretch: Stand facing a wall or a tree and place your hands on it for balance. Step one foot back, keeping the leg straight and that heel firmly on the ground. Lean forward until you feel a solid stretch in your calf muscle.
While hiking might seem like a niche activity, those who do it are often quite dedicated. Before we wrap up, let's look at some data to see how the average hiker stacks up.
Hiker Demographics & Habits
Statistic | Value |
|---|---|
Daily Participation Rate | 0.9% of U.S. adults who exercise |
Average Weekday Session | 2 hours |
Average Weekend Session | 2.7 hours |
Gender Split | 59% Male / 41% Female |
Average Age | 39 |
Source: U.S. Bureau of Labor Statistics
These numbers, which you can explore in more detail in these hiking participation statistics, show that hikers spend a good chunk of time on the trail. To enjoy those hours fully, you have to learn the difference between normal muscle soreness and the sharp, persistent signal of pain. That pain is your body's way of screaming "stop!"
Remember, rest days aren't a sign of weakness. They are a vital part of any effective training plan, giving your muscles the time they need to repair and get stronger for the next adventure.
Answering Your Hiking Training Questions
Even with the best plan laid out, you're bound to have some questions as you get started. That’s a good thing—it means you're taking this seriously. Let's dig into some of the most common questions I hear from hikers to make sure you're feeling confident and ready to go.
Think of this as our final chat before you lace up your boots. We'll clear up those lingering "what ifs" so your plan is not just solid on paper, but perfectly tailored to your real life.
How Long Does My Training Plan Really Need to Be?
This is the big one, and the honest answer is: it depends on where you're starting from and where you're going. If you're a regular gym-goer aiming for a moderate 6-mile day hike, a focused 4-week plan will probably do the trick. But if you’ve got your eye on a grueling multi-day trek with serious elevation gain, you need to give yourself more runway. A 12 to 16-week build-up is a much safer and more effective bet.
As a general rule of thumb, give yourself at least 8 weeks for any significant hike. That's enough time to build a solid cardio base and layer in trail-specific strength without rushing things and risking an injury that could derail your whole adventure.
What if I Live Somewhere Flat? No Hills, No Problem?
Living in a flat area is a super common hurdle, but it's definitely not a dealbreaker. You just have to get a little creative to mimic the burn of a long uphill climb. The goal is to create that same kind of sustained resistance.
Here are a few go-to solutions that work just as well:
Become best friends with the gym: Stair Masters and incline treadmills are your secret weapons. You can dial in the exact grade you need and just grind it out.
Hit the local stadium: Find a high school or college and do laps up and down the bleachers. It's a killer workout for your quads and glutes, the main muscles you need for climbing.
Use a parking garage: A big, multi-level parking garage offers a perfect, steady incline for practicing your hill repeats.
Step it up at home: This one's a game-changer. Load up your hiking pack and do weighted step-ups onto a sturdy box, bench, or even your own stairs.
The key isn't finding a literal mountain; it's about consistently training your body to work against gravity. Your muscles don't know the difference between a real trail and a flight of stairs—they just know resistance.
Should I Actually Train in Bad Weather?
The short answer? Yes, but with a big dose of common sense. Your goal hike isn’t going to get canceled for a bit of wind or drizzle, so you need to know how you and your gear will hold up.
Training in light rain or on a blustery day is an incredible way to build mental toughness. It's also the best time to find out if that "waterproof" jacket you bought is actually waterproof, or how your layering system performs once it gets a little damp.
Of course, safety is always the number one priority. Never, ever train outdoors during a thunderstorm or in dangerously icy or cold conditions. Use those days for a solid indoor strength session or give your body a well-deserved rest day.
How Much Weight Should I Carry in My Pack When Training?
Start light and build up gradually. A good starting point is around 10-15% of your body weight. From there, you can slowly add another 2-5 pounds every couple of weeks. The idea isn't to see how much you can possibly carry, but to let your body adapt to the load over time.
Your ultimate goal is to train with a weight that’s close to what you'll carry on the real hike. For a typical day hike, that might be 15-20 pounds (water, food, layers, safety gear). For a multi-day backpacking trip, you could be looking at 30 pounds or more. Remember why you're doing this: to strengthen your back, core, and shoulders for the real deal. Don't rush it.
Ready to conquer the trail in gear that matches your ambition? At RealOminousAthlete, we design performance sportswear that helps you push your limits. Find your perfect hiking apparel and game-changing products at https://bearcapes.store.
Comments